Background

Saturday, February 18, 2012

Labels and Rice Bags

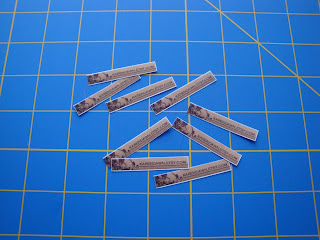
Two small projects (one super small) have been all I've had time for lately. First, I made some sew-on labels by using transfer paper and ribbon. I'm rather pleased with how they turned out.

Second, I made up a couple more rice bags (and plan to make more). This time I added in some lavender to the rice to help make it smell better. And I also added in a label to each bag. I really like how it looks with the label.


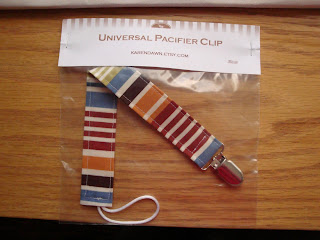
I also worked on getting some packaging ideas together. The one that is pretty much finished is the packaging for the pacifier clips. Here's what I have. Very simple, but I like it.

I hope to make more rice bags, some burp cloths, some more pacifier clips and matching bags this week. We'll see how much I actually have time to do!

Saturday, February 11, 2012

Charger Cords Holder

My husband and I have quite a few electronic devices and organizing and keeping track of the various charging cords has been a hassle. So I wanted to have some type of wall hanging with pockets that would help to keep all of the cords. On one of my favorite sewing blogs, Sew4Home, I found a tutorial for a 9-Pocket Door Caddy. Perfect!

It took me about a week to finish this project. Last weekend, I went to Joann's to look for fabric. I had learned from the previous project not to get something that matched too much. I wanted something brown because that's the color of the walls and some of the other decor in the room I plan to hang it. I found this lovely dark brown fabric with teal decorations on it. For the trim fabric, I was going to go with a completely different color, but after trying a few out, I found this fabric that was also brown and teal, but more of the teal and less brown. I debated for quite a while about it (although I knew that I needed to hurry home soon because my son would be hungry), but decided that although they were the same colors, the density of the colors were different in each fabric and the patterns were also different enough. Looking at the finished project, I think I did a much better job this time around with picking the fabric.

So I started by cutting out all my pieces and that's as far as I was able to get that day. I started with the pockets first (I had gotten the wrong interfacing so had to go back to get some more and so skipped over the first section until I could go get more). Just like the previous project, this one called for me to stitch the ditch. That was challenging last time, but this time the instructions were different. Instead of folding and pinning like the book said, the blog said to place the pin in the ditch itself. This made so much sense. By doing this, I could look at the back side and actually see whether or not I had caught the fabric on the back side in my stitch. This was so much easier than doing it the previous way and so this is how I will remember to stitch the ditch in the future.

Placing the binding was the easy part of the pockets. The next step was to do two pleats for each pocket panel. It was my first time to do a pleat, but Sew4Home had excellent instructions so I feel that I handled it okay. But doing the first pocket panel took quite a while so that was all I got done that day. The next day I was able to complete the two remaining pocket panels. It got a lot easier to do since I had already gone through the steps once before.

On Tuesday, I was able to get back to Joann's to get the correct interfacing. On this day I was able to sew the main body pieces together (the first section of the tutorial). I tackled the binding for the body the next day. For doing the corners of the binding, I actually preferred the method used in the Stitch by Stitch book, so I used that instead of the one on the tutorial, although they were very similar.

Then I came to the spot where I felt the tutorial was confusing and I got lost. Joining the two ends (start and finish) of the binding together (steps 10-15 of this section). I read the instructions several times and twisted and turned my two ends of binding, finally deciding which was to sew them. But when I cut down the ends, I realized that I had sewed them more as a mobius strip instead of flat. I went back to the instructions and just couldn't get it. So I just ripped it out and tucked the ends under. I think that had I been able to follow the tutorial, it would have made a very nice join, but it turned out okay. Perhaps I'll try this section of the tutorial again in the future (or maybe see if there is a video or another set of instructions for this technique). Pictures would have been very helpful for this section and is my only criticism of this tutorial.

I didn't get a chance to sew on Thursday and I didn't think that I would on Friday, but after my son went to bed, my husband wanted to play a computer game so I found myself with a little time on my hands. I decided to sew on the pocket panels. The most difficult part of this process was placing the panels. The instructions are very clear, but I was having problems seeing my chalk lines (since it was evening, the light in the room wasn't as bright so I was having a hard time seeing period), so I just eyeballed some of it. Then I sewed the pocket panels on and it was almost complete. I just had the grommets to add at the top. That turned out to be pretty simple (once I figured out which two pieces of the grommet to use--at first I had two of the same pieces instead of two different ones and couldn't figure out how they were supposed to snap together).

I'm so happy with how this project turned out and I can't wait to have all the charging cords organized for once!


Friday, February 3, 2012

Picnic Placemat and Utensil Holder

I finally returned to my Stitch by Stitch book to work on the next project, listed as a picnic placement with pockets to hold utensils. Of course, my first thought was that it would make a nice holder for knitting needles.

I delayed this project for a while. It calls for 60" and 20" of 3" wide bias tape. Out of the fat quarter I was using, I was able to get the 60" piece but there was not enough left for 20". So I had to wait until I got back to the store to pick up more of the same fabric. I finally did that and then looked at the instructions. I needed two 18" squares of the coordinating fabric. I had also picked up just a fat quarter for it, which obviously was not enough, so that created the need for another trip to the store to buy yet more fabric. (I think the reason I thought fat quarters would be enough is because in the middle of this project description is a side bar with information about fat quarters so I assumed that was what was being used for this project. Once I looked back at the supply list, I now realize that is not the case.)

So finally I had my bias tape and my two 18" squares in a coordinating fabric. And here's one big lesson I learned in this project. Coordinating fabric does not need to be super matchy. That's what I have and there's really no contrast. One fabric really just blends into the other and it's not very appealing to the eye. Next time I do a project like this (or really any project), I'll make sure to make different fabric choices.


I had no problems at first, at least nothing really big. I got the first edge with bias tape put into place. I did have a little mistake here in not completely catching a 1 inch section of the bias tape when I was stitching the ditch (a new technique for me). I also had a similar problem in two areas on the larger piece of bias tape. So that's something I'm going to need to work on in the future: making sure my bias tape is positioned correctly.

I did forget to leave 2" of bias tape at the beginning of the long section (to later fold over to create a smooth edge), so that edge is a little rough. But turning the corners worked out nicely, so I was happy about that.


The other thing that I learned while making this project is that I don't like making bias tape. At least I hate folding it in and pressing it. The size called for in this pattern is not one that I have a bias tape maker for so I couldn't try that (I have 1", 1/2", and 1/4" -- this called for something close to 1.5"). Perhaps it wouldn't be as bad if I had been able to use one of those. I looked at etsy and noticed there are people who sell bias tape. It seems almost worth it to buy it rather than make it myself. But that's a sewing skill that it seems is important to learn as so many of the projects I have ear marked seem to call for its use, so I guess I'll just keep practicing with it.

I'm not sure what I'm going to use this for yet. Right now I have some of Luke's stuff in it (tubes of Vaseline, tube of lanolin, tube of diaper cream), which seems to fit nicely.

Thursday, January 26, 2012

Pacifier Clips and Carry Bag

I saw a really neat tutorial on Sew4Home that included pacifier clips and a matching bag to carry them in. I didn't use the tutorial for the clips (since I figured out how to make them myself), but I definitely was interested in the matching bag, so I decided to try it out.

I carefully cut out my fabric yesterday (I cut fabric for four sets using some of the fat quarters I had picked up). Today I worked with some material with cats on it. And I'm really quite happy with how it turned out. The tutorial was easy to follow and the bag itself wasn't that difficult to do.

I think the biggest thing I learned was placement of the fabric. I did manage to think about which was was right side up so that I would get the material to face the correct direction, but I didn't think too hard about which fabric would be the top piece and which the bottom. Since the top is folded in to create the place for the cord to go, the pattern at the top doesn't take up as much of the bag as the bottom one. And for this particular set of fabric, I would have rather seen more of the cat faces and less of the yarn and paws. So if I were to use this exact fabric again, I would have switched them. But it definitely gives me something to think about in picking out placement for future bags.

So this was a really fun project and one I'll definitely be making again (and again).

Wednesday, January 25, 2012

Rice Bag and other projects

I tried a new project this week, a rice bag to heat in the microwave and put on sore areas (such as my neck and shoulders which have been really sore lately). I got the tutorial from PatternSpot. I bought a huge bag of rice and found some material that I liked but didn't love (in case I really messed up this first try so I wouldn't be too upset at "wasting" amazing material).

Overall the project was actually pretty simple but I did learn a few things. First, I definitely need to pin as the two main pieces moved a bit as I was sewing them, causing them to get out of line. Second, I need to use a different marking pen as I couldn't get pink lines off the fabric when I was done. Oops. At least they are fairly light. Third, I do need a funnel. I tried just using a piece of paper and it worked but it was not easy to use and an actual funnel would have made it much better. Finally, when the bag is heated, the rice smells and it's not entirely pleasant, so I will add some scent into the bag along with the rice in future attempts. Here's the bag:


I also have a wonderful husband who surprised me on Monday with an inkjet printer. I have a laserjet and was bemoaning the fact that I couldn't use printable iron-on fabric in the laserjet. So I set up the new printer and created some labels for my etsy shop.


Then I added them to some of the pacifer clips:


Now I'm just waiting for a sunny day so I can have good lighting to take pictures of the clips and then I'll list them in my etsy shop.


Finally, I was in Hobby Lobby on Monday and some fabric caught my eye. I'm not sure what it was about it that attracted me, but I went back to it several times before decided to go ahead and buy some. I got a yard and a half. I have no idea yet what I'm going to do with it, but it makes me happy to look at it, so I'll just have to keep it in mind while I'm looking at projects and find something to do with it.

Monday, January 16, 2012

Mug Rug Success

So I tried making another mug rug today. This time I didn't need to look at the instructions for any of it, which made me rather happy for remembering what to do. And this time I really tried to focus on being straight with the cutting and sewing.

The first thing that I did was take all of the squares and make the edges straight instead of keeping the edges from the pinking shears as the fabric came. I think that was a major element in helping me keep the seams straight. It took some time, but in the end I think that it was well worth it.

I also made sure, when I was sewing the 5 half blocks section to the 2 full block section that I kept the seams pressed open. Last time I had that section on the bottom (the one with the 5 blocks), so I didn't pay attention to how it was going through the machine and the seams got all wonky on the back. I don't know if that really made a huge difference, but it made me feel better.

After I did the quilting this time around, I cut down the edges using the quilted lines as my guide for straightness (the thing I didn't do last time and should have). So much better!

The bias tape has a few spots which could be a bit better, but overall, I'm happy with how it turned out. This one is destined as a gift for someone so I'm glad to see how nice it looks.


The green one was the first one


Pacifier Clips and Mug Rug

On Saturday, I spent a good chunk of the evening working more on my pacifier clips. I've been trying different methods, especially for securing the two short ends, and I have been almost happy but not quite there. Well, on Saturday, I got there. I figured out what will work and make a finished product that I am both personally and professionally happy with.

Of course, it didn't just instantly happen. I had some interesting experiences first. The day before I had decided that I finally needed to change the needle on my sewing machine. Since I hadn't done it before, I was a little nervous, but I got out my manual and by following instructions, I was able to successfully change the needle. And like changing the presser foot, it's really not that difficult at all.

So I was all ready to sit down and sew with a brand new needle on the machine. But something just wasn't working. The needle seemed to be making huge holes in the fabric and it was going through as if it were actually a more dull needle than a fresh one. What on earth? Well, apparently the 3-pack of needles that came with my machine contained three different sizes instead of all the same. But they weren't really labeled as such. I did finally notice the tiny tiny numbers on the needle itself. And the needle I had put in the machine? The biggest one, of course. Oops. So I put in the right size needle for my project and all was well once again.

So, I completed one pacifier clip that went to the trash can because of the giant needle holes, one pacifier clip where I was practicing the new technique and made a passable clip (will keep it for Luke), and then four pacifier clips that I feel happy enough to be able to actually try to sell. I've ordered some iron-on labels with my etsy shop name on them, so as soon as those arrive, I'll attach them to these four clips and get them listed in the shop to see how they do.


Then on Sunday, my husband was watching a football game so he took charge of the baby for that time and I got a couple of hours of sewing time. This time I was a lot more adventurous and I decided to follow a tutorial for a mug rug. The instructions for the tutorial were really great. First, I had to run to Joann's to get some fabric and other needed odds and ends. Then I sat down and planned out which squares were going to go on the back and which on the front. I had 8 different ones instead of the 10 the tutorial calls for, so I picked two to use twice.

Four of them stayed the 5"x5" squares that they started out as and would be used for the back. Then for the front, I would use two 5"x5" squares and 5 halves. So I figured out which would be the large squares and which would be the half squares. Then I started cutting. Oops. I accidentally cut the two that were supposed to remain the large square along with the rest. Good thing that the pack I got came with quite a few more squares than I needed. From now on I definitely need to make sure to keep my cutting stack well organized.

Then I started to sew them all together. I think I did a pretty good job overall, although on the strip of five joined together, I think I got a couple of them a bit uneven, which once one is uneven does affect the rest. But I got the back and front finished and in passable condition. Next came putting the cotton batting between the two layers and doing some quilting (just straight lines). That was a lot of fun! However, although my lines were straight according to one another, they were not perfectly straight against the edge so that's something I'll need to work on.

After that, I cut off the edges to make everything neat and square. This is where I should have cut straight according to my quilted lines rather than trying to get the edges straight according to how they should be. That might have resulted in the fabric itself being a bit skewed but I think the end product would have looked just a little nicer. But I just consider that another lesson learned.

Then came my biggest challenge: putting on the bias tape around the edges. The same website had a great tutorial about doing just that and so I followed along. And you know what? Yes, it was challenging, but it was also quite doable, even the corners. In fact, I found the corners to be a lot easier than I thought they would be. The biggest things to work on here for next time will be to sew closer to the edge when I fold the bias tape around and top stitch it and also to really make sure the corners are nice and neat (three of them were good but one could have been better).

Pretty good corner

Corner that could have been better
Although the end product does show a lot of places where lines are just not at all straight, I'm quite pleased with how it turned out. This will definitely be a project I make again and I hope to get a much straighter result next time taking into account the lessons I learned on this first one.

Front

Back