Background

Tuesday, February 28, 2012

Pacifier Clips Galore and More

I'm going to be selling some of my items (both sewn and knit) in a shop downtown--a really neat place called the Natural Parenting Education Network--so I've been working on creating more inventory. So one thing I've been doing is making a whole bunch of pacifier clips. I've been trying to get a variety of fabric so that there are a lot to choose from. I also made a few sets of the clips with a matching carrying bag. I have the rice bags and plan to make a few more (the lavender, by the way, makes it smell so wonderful!) as well as some small "boo boo sacks" for kids. And I've been knitting baby hats and have some other knitted items to take there. I'm excited to be part of the boutique and to also help out NPEN so it can continue to offer the wonderful programming and events it has been doing.

But I have to admit that I'm a little burned out on making pacifier clips! I have six more all ready to go but for the sewing up, so I think I'll finish those and then take a break from making them for a little while. After doing the extra rice bags and boo boo sacks, I'm going to work on another project--for me. Or rather, for my son.

I'm going to try my hand at making a quilt. I have no idea how successful I'll be, but I'm going to try. It's going to be simple. I bought some charm packs, so I'll just be sewing the squares together and then for the quilting I'll do simple diagonal lines. But I picked some fabric that I'm really excited about and I'm sure that I'll learn a lot from this simple (although for me perhaps not so simple since it will be my first time) project.

I looked through the various charm packs available at Fat Quarter Shop and really liked Ten Little Things, so that is the one I decided to go with (and I will definitely order from FQS again as it was shipped promptly and was easy to order). I bought three packs so that I would have plenty of each square to choose from. And any leftovers will be used to do some applique on onesies and bibs. I need to figure out how big I want to make it so that I'll know how many squares to sew for each row and then how many rows to make. But first I need to do some reading up on how to do something like this. I think the biggest question I have right now is about which way to press the seams, so that's what I'm going to focus on right now. Then I'm just going to dive right in.

I don't yet have the fabric for the back or border. I want to get the top pieced first and then make a decision for what I want to do for that.


I had to come back and edit this post after what I saw on Geek Crafts today: A Call to Arms


Saturday, February 18, 2012

Labels and Rice Bags

Two small projects (one super small) have been all I've had time for lately. First, I made some sew-on labels by using transfer paper and ribbon. I'm rather pleased with how they turned out.

Second, I made up a couple more rice bags (and plan to make more). This time I added in some lavender to the rice to help make it smell better. And I also added in a label to each bag. I really like how it looks with the label.


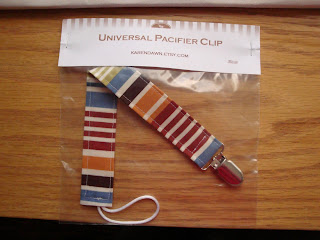
I also worked on getting some packaging ideas together. The one that is pretty much finished is the packaging for the pacifier clips. Here's what I have. Very simple, but I like it.

I hope to make more rice bags, some burp cloths, some more pacifier clips and matching bags this week. We'll see how much I actually have time to do!

Saturday, February 11, 2012

Charger Cords Holder

My husband and I have quite a few electronic devices and organizing and keeping track of the various charging cords has been a hassle. So I wanted to have some type of wall hanging with pockets that would help to keep all of the cords. On one of my favorite sewing blogs, Sew4Home, I found a tutorial for a 9-Pocket Door Caddy. Perfect!

It took me about a week to finish this project. Last weekend, I went to Joann's to look for fabric. I had learned from the previous project not to get something that matched too much. I wanted something brown because that's the color of the walls and some of the other decor in the room I plan to hang it. I found this lovely dark brown fabric with teal decorations on it. For the trim fabric, I was going to go with a completely different color, but after trying a few out, I found this fabric that was also brown and teal, but more of the teal and less brown. I debated for quite a while about it (although I knew that I needed to hurry home soon because my son would be hungry), but decided that although they were the same colors, the density of the colors were different in each fabric and the patterns were also different enough. Looking at the finished project, I think I did a much better job this time around with picking the fabric.

So I started by cutting out all my pieces and that's as far as I was able to get that day. I started with the pockets first (I had gotten the wrong interfacing so had to go back to get some more and so skipped over the first section until I could go get more). Just like the previous project, this one called for me to stitch the ditch. That was challenging last time, but this time the instructions were different. Instead of folding and pinning like the book said, the blog said to place the pin in the ditch itself. This made so much sense. By doing this, I could look at the back side and actually see whether or not I had caught the fabric on the back side in my stitch. This was so much easier than doing it the previous way and so this is how I will remember to stitch the ditch in the future.

Placing the binding was the easy part of the pockets. The next step was to do two pleats for each pocket panel. It was my first time to do a pleat, but Sew4Home had excellent instructions so I feel that I handled it okay. But doing the first pocket panel took quite a while so that was all I got done that day. The next day I was able to complete the two remaining pocket panels. It got a lot easier to do since I had already gone through the steps once before.

On Tuesday, I was able to get back to Joann's to get the correct interfacing. On this day I was able to sew the main body pieces together (the first section of the tutorial). I tackled the binding for the body the next day. For doing the corners of the binding, I actually preferred the method used in the Stitch by Stitch book, so I used that instead of the one on the tutorial, although they were very similar.

Then I came to the spot where I felt the tutorial was confusing and I got lost. Joining the two ends (start and finish) of the binding together (steps 10-15 of this section). I read the instructions several times and twisted and turned my two ends of binding, finally deciding which was to sew them. But when I cut down the ends, I realized that I had sewed them more as a mobius strip instead of flat. I went back to the instructions and just couldn't get it. So I just ripped it out and tucked the ends under. I think that had I been able to follow the tutorial, it would have made a very nice join, but it turned out okay. Perhaps I'll try this section of the tutorial again in the future (or maybe see if there is a video or another set of instructions for this technique). Pictures would have been very helpful for this section and is my only criticism of this tutorial.

I didn't get a chance to sew on Thursday and I didn't think that I would on Friday, but after my son went to bed, my husband wanted to play a computer game so I found myself with a little time on my hands. I decided to sew on the pocket panels. The most difficult part of this process was placing the panels. The instructions are very clear, but I was having problems seeing my chalk lines (since it was evening, the light in the room wasn't as bright so I was having a hard time seeing period), so I just eyeballed some of it. Then I sewed the pocket panels on and it was almost complete. I just had the grommets to add at the top. That turned out to be pretty simple (once I figured out which two pieces of the grommet to use--at first I had two of the same pieces instead of two different ones and couldn't figure out how they were supposed to snap together).

I'm so happy with how this project turned out and I can't wait to have all the charging cords organized for once!



Friday, February 3, 2012

Picnic Placemat and Utensil Holder

I finally returned to my Stitch by Stitch book to work on the next project, listed as a picnic placement with pockets to hold utensils. Of course, my first thought was that it would make a nice holder for knitting needles.

I delayed this project for a while. It calls for 60" and 20" of 3" wide bias tape. Out of the fat quarter I was using, I was able to get the 60" piece but there was not enough left for 20". So I had to wait until I got back to the store to pick up more of the same fabric. I finally did that and then looked at the instructions. I needed two 18" squares of the coordinating fabric. I had also picked up just a fat quarter for it, which obviously was not enough, so that created the need for another trip to the store to buy yet more fabric. (I think the reason I thought fat quarters would be enough is because in the middle of this project description is a side bar with information about fat quarters so I assumed that was what was being used for this project. Once I looked back at the supply list, I now realize that is not the case.)

So finally I had my bias tape and my two 18" squares in a coordinating fabric. And here's one big lesson I learned in this project. Coordinating fabric does not need to be super matchy. That's what I have and there's really no contrast. One fabric really just blends into the other and it's not very appealing to the eye. Next time I do a project like this (or really any project), I'll make sure to make different fabric choices.


I had no problems at first, at least nothing really big. I got the first edge with bias tape put into place. I did have a little mistake here in not completely catching a 1 inch section of the bias tape when I was stitching the ditch (a new technique for me). I also had a similar problem in two areas on the larger piece of bias tape. So that's something I'm going to need to work on in the future: making sure my bias tape is positioned correctly.

I did forget to leave 2" of bias tape at the beginning of the long section (to later fold over to create a smooth edge), so that edge is a little rough. But turning the corners worked out nicely, so I was happy about that.


The other thing that I learned while making this project is that I don't like making bias tape. At least I hate folding it in and pressing it. The size called for in this pattern is not one that I have a bias tape maker for so I couldn't try that (I have 1", 1/2", and 1/4" -- this called for something close to 1.5"). Perhaps it wouldn't be as bad if I had been able to use one of those. I looked at etsy and noticed there are people who sell bias tape. It seems almost worth it to buy it rather than make it myself. But that's a sewing skill that it seems is important to learn as so many of the projects I have ear marked seem to call for its use, so I guess I'll just keep practicing with it.

I'm not sure what I'm going to use this for yet. Right now I have some of Luke's stuff in it (tubes of Vaseline, tube of lanolin, tube of diaper cream), which seems to fit nicely.