Background

Thursday, January 26, 2012

Pacifier Clips and Carry Bag

I saw a really neat tutorial on Sew4Home that included pacifier clips and a matching bag to carry them in. I didn't use the tutorial for the clips (since I figured out how to make them myself), but I definitely was interested in the matching bag, so I decided to try it out.

I carefully cut out my fabric yesterday (I cut fabric for four sets using some of the fat quarters I had picked up). Today I worked with some material with cats on it. And I'm really quite happy with how it turned out. The tutorial was easy to follow and the bag itself wasn't that difficult to do.

I think the biggest thing I learned was placement of the fabric. I did manage to think about which was was right side up so that I would get the material to face the correct direction, but I didn't think too hard about which fabric would be the top piece and which the bottom. Since the top is folded in to create the place for the cord to go, the pattern at the top doesn't take up as much of the bag as the bottom one. And for this particular set of fabric, I would have rather seen more of the cat faces and less of the yarn and paws. So if I were to use this exact fabric again, I would have switched them. But it definitely gives me something to think about in picking out placement for future bags.

So this was a really fun project and one I'll definitely be making again (and again).

Wednesday, January 25, 2012

Rice Bag and other projects

I tried a new project this week, a rice bag to heat in the microwave and put on sore areas (such as my neck and shoulders which have been really sore lately). I got the tutorial from PatternSpot. I bought a huge bag of rice and found some material that I liked but didn't love (in case I really messed up this first try so I wouldn't be too upset at "wasting" amazing material).

Overall the project was actually pretty simple but I did learn a few things. First, I definitely need to pin as the two main pieces moved a bit as I was sewing them, causing them to get out of line. Second, I need to use a different marking pen as I couldn't get pink lines off the fabric when I was done. Oops. At least they are fairly light. Third, I do need a funnel. I tried just using a piece of paper and it worked but it was not easy to use and an actual funnel would have made it much better. Finally, when the bag is heated, the rice smells and it's not entirely pleasant, so I will add some scent into the bag along with the rice in future attempts. Here's the bag:


I also have a wonderful husband who surprised me on Monday with an inkjet printer. I have a laserjet and was bemoaning the fact that I couldn't use printable iron-on fabric in the laserjet. So I set up the new printer and created some labels for my etsy shop.


Then I added them to some of the pacifer clips:


Now I'm just waiting for a sunny day so I can have good lighting to take pictures of the clips and then I'll list them in my etsy shop.


Finally, I was in Hobby Lobby on Monday and some fabric caught my eye. I'm not sure what it was about it that attracted me, but I went back to it several times before decided to go ahead and buy some. I got a yard and a half. I have no idea yet what I'm going to do with it, but it makes me happy to look at it, so I'll just have to keep it in mind while I'm looking at projects and find something to do with it.

Monday, January 16, 2012

Mug Rug Success

So I tried making another mug rug today. This time I didn't need to look at the instructions for any of it, which made me rather happy for remembering what to do. And this time I really tried to focus on being straight with the cutting and sewing.

The first thing that I did was take all of the squares and make the edges straight instead of keeping the edges from the pinking shears as the fabric came. I think that was a major element in helping me keep the seams straight. It took some time, but in the end I think that it was well worth it.

I also made sure, when I was sewing the 5 half blocks section to the 2 full block section that I kept the seams pressed open. Last time I had that section on the bottom (the one with the 5 blocks), so I didn't pay attention to how it was going through the machine and the seams got all wonky on the back. I don't know if that really made a huge difference, but it made me feel better.

After I did the quilting this time around, I cut down the edges using the quilted lines as my guide for straightness (the thing I didn't do last time and should have). So much better!

The bias tape has a few spots which could be a bit better, but overall, I'm happy with how it turned out. This one is destined as a gift for someone so I'm glad to see how nice it looks.


The green one was the first one


Pacifier Clips and Mug Rug

On Saturday, I spent a good chunk of the evening working more on my pacifier clips. I've been trying different methods, especially for securing the two short ends, and I have been almost happy but not quite there. Well, on Saturday, I got there. I figured out what will work and make a finished product that I am both personally and professionally happy with.

Of course, it didn't just instantly happen. I had some interesting experiences first. The day before I had decided that I finally needed to change the needle on my sewing machine. Since I hadn't done it before, I was a little nervous, but I got out my manual and by following instructions, I was able to successfully change the needle. And like changing the presser foot, it's really not that difficult at all.

So I was all ready to sit down and sew with a brand new needle on the machine. But something just wasn't working. The needle seemed to be making huge holes in the fabric and it was going through as if it were actually a more dull needle than a fresh one. What on earth? Well, apparently the 3-pack of needles that came with my machine contained three different sizes instead of all the same. But they weren't really labeled as such. I did finally notice the tiny tiny numbers on the needle itself. And the needle I had put in the machine? The biggest one, of course. Oops. So I put in the right size needle for my project and all was well once again.

So, I completed one pacifier clip that went to the trash can because of the giant needle holes, one pacifier clip where I was practicing the new technique and made a passable clip (will keep it for Luke), and then four pacifier clips that I feel happy enough to be able to actually try to sell. I've ordered some iron-on labels with my etsy shop name on them, so as soon as those arrive, I'll attach them to these four clips and get them listed in the shop to see how they do.


Then on Sunday, my husband was watching a football game so he took charge of the baby for that time and I got a couple of hours of sewing time. This time I was a lot more adventurous and I decided to follow a 
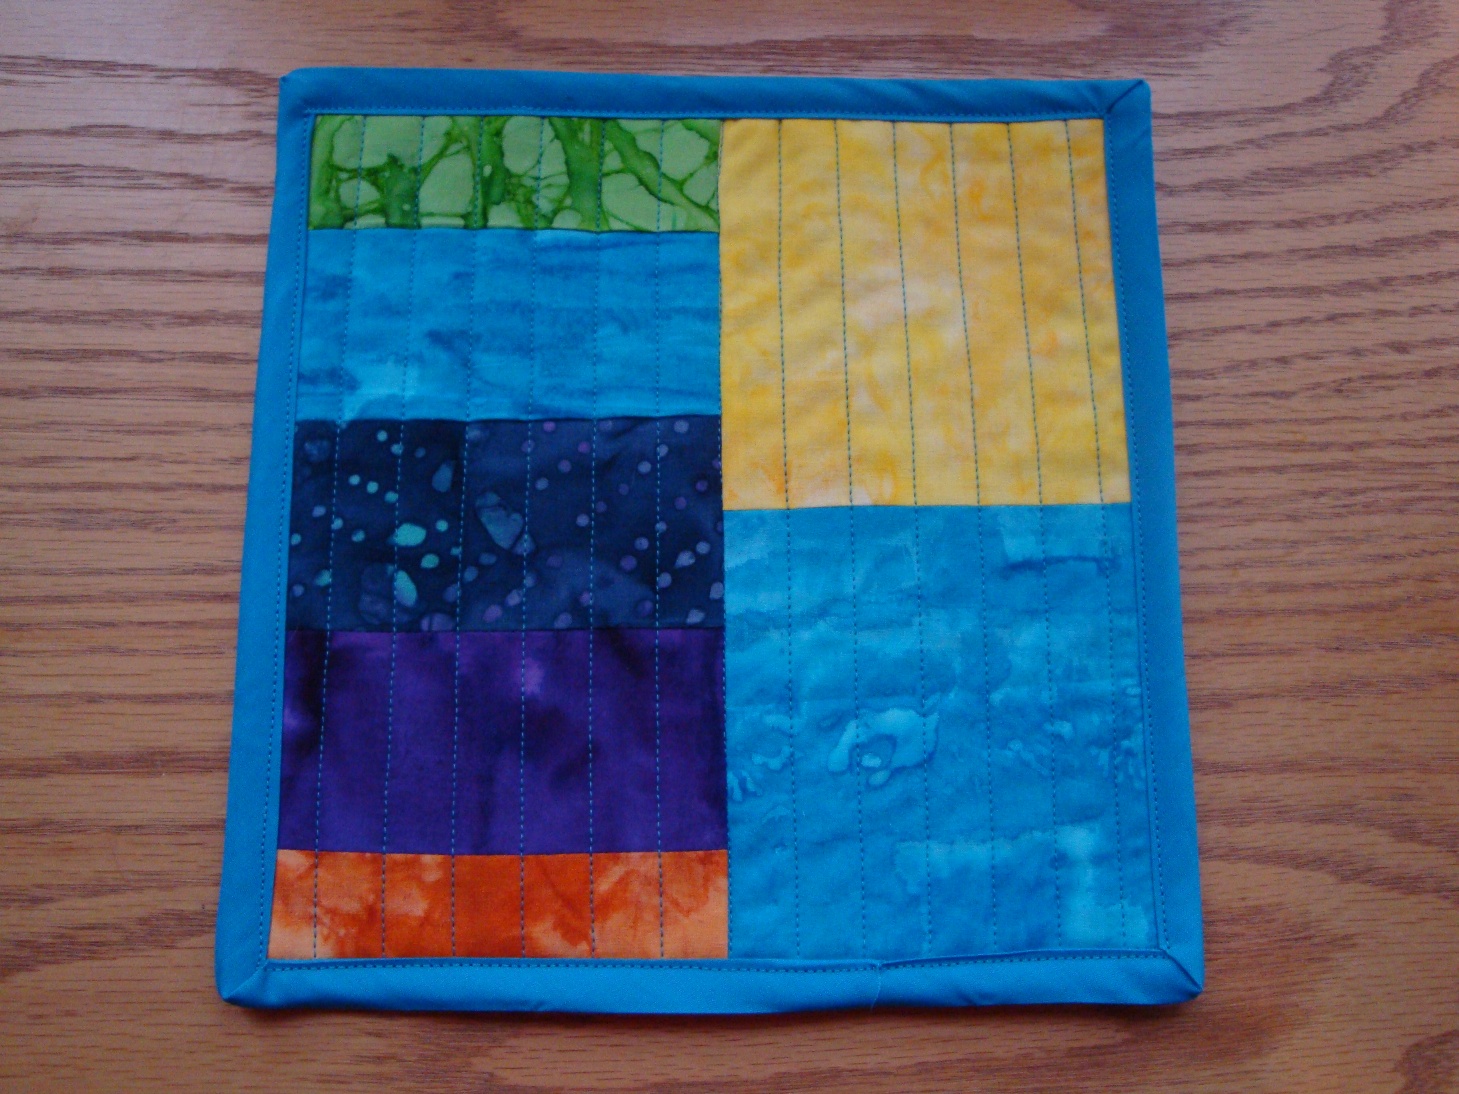
tutorial for a mug rug. The instructions for the tutorial were really great. First, I had to run to Joann's to get some fabric and other needed odds and ends. Then I sat down and planned out which squares were going to go on the back and which on the front. I had 8 different ones instead of the 10 the tutorial calls for, so I picked two to use twice.

Four of them stayed the 5"x5" squares that they started out as and would be used for the back. Then for the front, I would use two 5"x5" squares and 5 halves. So I figured out which would be the large squares and which would be the half squares. Then I started cutting. Oops. I accidentally cut the two that were supposed to remain the large square along with the rest. Good thing that the pack I got came with quite a few more squares than I needed. From now on I definitely need to make sure to keep my cutting stack well organized.

Then I started to sew them all together. I think I did a pretty good job overall, although on the strip of five joined together, I think I got a couple of them a bit uneven, which once one is uneven does affect the rest. But I got the back and front finished and in passable condition. Next came putting the cotton batting between the two layers and doing some quilting (just straight lines). That was a lot of fun! However, although my lines were straight according to one another, they were not perfectly straight against the edge so that's something I'll need to work on.

After that, I cut off the edges to make everything neat and square. This is where I should have cut straight according to my quilted lines rather than trying to get the edges straight according to how they should be. That might have resulted in the fabric itself being a bit skewed but I think the end product would have looked just a little nicer. But I just consider that another lesson learned.

Then came my biggest challenge: putting on the bias tape around the edges. The same website had a great tutorial about doing just that and so I followed along. And you know what? Yes, it was challenging, but it was also quite doable, even the corners. In fact, I found the corners to be a lot easier than I thought they would be. The biggest things to work on here for next time will be to sew closer to the edge when I fold the bias tape around and top stitch it and also to really make sure the corners are nice and neat (three of them were good but one could have been better).

Pretty good corner

Corner that could have been better
Although the end product does show a lot of places where lines are just not at all straight, I'm quite pleased with how it turned out. This will definitely be a project I make again and I hope to get a much straighter result next time taking into account the lessons I learned on this first one.

Front

Back

Tuesday, January 10, 2012

Napkins, Supplies, Bias Tape, and Bib

Yesterday I finished napkins 3 and 4, which means that project is complete. And I was right: these last two napkins were much easier than the first two. That's not to say that they are perfect, but I definitely felt a lot more confidant while making them and also was able to make both in about the same amount of time it took me to do the second one (the first one took even longer). So it feels good to be improving.


I said that this time I would focus more in the corners and I did just that. They were not exactly as I would like them, but these corners are better than the first two, so again, improvement.


One thing that I did notice while working on the second napkin was that my cutting surface seemed a bit small and limiting. I got one of those mats that is a cutting board on one side and an ironing board on the other. But trying to cut an 18" square out of a much bigger piece of fabric was challenging. So for the third and fourth napkins, I cut directly on my kitchen table. Yes, I knew that I was risking cutting into the table, but it's one that I've had for years (got it as my first piece of furniture in my first apartment) and it's something we'll be replacing next time we move, so I wasn't too concerned. And having that larger surface to cut on really made all the difference in how quickly--and more importantly, precisely--I was able to cut.

So today I went out and bought a larger cutting mat, this time just a cutting mat and not with an ironing board on the other side. I worked on a couple of projects today and this board was absolutely wonderful. I'm so glad that I got it. I also picked up a couple more of those acrylic rulers in different sizes so I could use multiple rulers in helping to measure and cut (which is how I saw my MIL doing it). That also worked really nicely today. I also picked up a larger rotary cutter (I had just a tiny one before and cutting through even two layers sometimes was difficult). I now feel that my cutting supplies are pretty solid for a while.

Other supplies purchased today were some stencils (I want to do more applique) and a little bottle of fray check. So when I got home, I pulled out the final blank bib and the scraps of fabric that I had gotten from my MIL. I used one of the new stencils to create the top and bottom of a cupcake. This time I put small pieces of the fusible webbing on the back first and then cut out my shape (tracing the stencil onto the webbing). That worked a heck of a lot better. I used fray check around the edges and set it aside to dry.

Then I started on my next project, which includes some 3" bias tape. So I needed to make the bias tape. Instead of doing the continuous bias tape that I botched last time, I decided to just cut strips and sew them together. I followed a tutorial on Sew4Home and I was able to make bias tape. And it was a bit painstaking to sew each strip together although I really did get the hang of it by the last few. It definitely turned out better than my previous attempt, but I didn't find myself enjoying making it. So I think I'm going to give the continuous bias tape another try at some point.


By this time, my cupcake pieces were dry so I ironed them onto the bib. Then instead of using the satin stitch all the way around, I just did a straight stitch around the edges more as a highlight than to hold them on or keep the edges from fraying. Although there are a few little bobbles here and there, I rather like the way it turned out and I think I'll be doing more in the future. I have some plain white (and other colors) onesies that I think I'll try next.


Finally, I started working on some more pacifier clips. I only got one finished before the baby woke up. I am trying different ways of putting them together and this time I used pinking sheers for the two short edges. I do like that it seemed to make those sides less bulky but I'm still not 100% happy with how it looks. So I'll try something else next time.


Thursday, January 5, 2012

Second Napkin (and more)

I've had to put sewing on the back burner for a couple of weeks as we were traveling for the holidays. But we got back on Monday and I finally got to sit down at my sewing machine again today. Today's project was napkin #2 of 4 from the Stitch by Stitch book that I've been following. Napkin 1 had a few issues and so I worked to fix some of those on this second try and I feel that I succeeded (but of course have more issues to work on with the final two napkins).

I have to say that so far my least favorite part about sewing is the cutting. I just don't seem to be able to really do that well. Of course I'm sure as with everything else, it's all about practice. On the first napkin, because I had trouble getting the sides straight, I ended up with an 18" square instead of the 19" square called for by the book. So to make the napkins match, I aimed for an 18" square this time. And I did succeed at that, but it did take a bit of time to do it. I think that I need a bigger cutting surface and also one that is a bit taller so I'm not so stooped down. But for now I'll have to deal with what I have.

So after getting my square, I sat down at my machine to finish the edges, using the zig zag stitch. Eek! The stitching looked just wrong right away! I immediately stopped and used my seam ripper to get rid of what I had just sewed. What was going on? I pulled out a piece of scrap fabric and tried again. Once more I had something that just wasn't right. I started playing around with my tension knob and it just still wasn't working right. I knew it was something about the tension, but I wasn't sure how to correct it. I checked to see that I had threaded the machine correctly. Yes, I had. I pulled out the bobbin (my machine has a drop-in bobbin) and put it back in. I tried sewing again and suddenly it started working like it was supposed to. I guess something had gone wrong with the bobbin and just pulling it out and putting it back it fixed it. Whew!


After stitched the edges, it was to the iron for folding and pressing. I folded down the corners and pressed them and then folded the edges. Last time I didn't use pins, but this time I used a couple on each side. I felt that it helped me to keep that edge straight. The biggest issue this time around was that I felt that I could have done a much better job getting the corners to be all nice and neat, so that will be my focus for napkin #3.


But I got everything pressed and then it was back to the machine to stitch down the hem. This time I really focused on keeping a straight line. And I started in the corner instead of along one side this time (last time I ended up not coming back to line up at the same point I started). I felt much happier with the stitching this time and although it may not have been perfectly straight, there are no obvious places on this one where I had to move the line of stitching over. And I matched up the end with the beginning rather nicely.


So although it's still not perfect, this napkin was much better than the first one. I think that's something good about this project. Although I definitely would like to move on to another project, doing four napkins really gives me a chance to perfect the things that don't quite go right with the first couple of napkins. So by that logic, the fourth one should be a breeze and look really great. At least here's hoping!


And now the more. Two things did happen over the trip: I really started to look at sewing blogs and also Pinterest and I got lots of scrap fabric.

First, Pinterest. Here's my Sewing Projects to Make board. As you can see, I have just a few projects on there. ;) I'm adding more and more as I see great blog posts with patterns/tutorials as well as what other people have been pinning themselves. And my board seems to be pretty popular as I've gotten several followers and lots of repins. That's quite exciting!

As for the scrap fabric, my MIL is a quilter and had two giant garbage bags full of scrap fabric. She let me and my SIL look through it and pick out anything we wanted. So we did and we both ended up with a good pile of fabric. I also got several of the bits of fabric that you sew and stuff to make toys. I figured that would be good practice for stitching as well as getting a useful item at the end. So I have a nice little stash of smaller pieces of fabric to use for things like the pacifier clips.