Background

Saturday, March 31, 2012

Coloring Bag and Fabric Envelope

My sewing machine has stayed plugged into the wall for the past two weeks, so that I can sit down to it quickly whenever I have a free couple of minutes. Yet even so, I haven't had a ton of time to sew lately. But I have definitely been dreaming up lots of new projects. One of the moms in my moms' group showed me this thing called a quillow, which is a quilt that folds up and is tucked into a little pocket to make a pillow. How genius is that? I decided that I just had to make one (or two) so I went to Joann's to pick out fabric. So happy to see that the licensed fabrics were 50% off! So I got enough fabric to make a Star Wars quillow and a Muppets quillow. Now I just need to actually start them.

What I did do this week was make another mug rug, which apparently I completely forgot to take a picture of. What I'm enjoying about the mug rugs is that I get to try out different fabric placement choices and decisions such as which color thread to use and which color binding. For the one I made that didn't make it in front of the camera, I could have gone with a soft green or a bright teal. I actually have enough of the fabric to do both. So I did the soft green first. When I do the bright teal, I know that although the fabric may be the same, the different fabric placement and accent colors will definitely make them look like very different pieces. So I'm having fun making these. I've taken the three I've made recently to The Craft House, so I hope other people like them.

Using a tutorial, I decided to try making a mini crayon tote. I picked some monster fabrics in my children's stash. For the inside, I picked some bright colorful stripes (The tutorial says cotton twill was used for the lining. I did notice that the bag was a little flimsy so I think I might try using some of the canvas that I have leftover from another project next time.). This was a fun project and one I definitely would like to try again.


Using another tutorial, I also made a fabric envelope. This is a great project for using some fat quarters and I think I'll make more of these. The only thing I think I'll change is to add some velcro for the closure so that it will have a way to fasten. 


Today I went up to The Craft House to drop off some new inventory and I took a few pictures.

The booth as a whole. I picked this space because of this wooden structure. I liked the shelves as well as the dowel rods so I could hang stuff on them.

Much of this area contains my knitted items, but on the second shelf I have the burp cloths in a basket and the mug rugs laying down on the center of the shelf. You can see the crayon tote hanging on one of the rods.

This is where the rice therapy bags and boo boo bags are located. So far, these have been the best sellers out of my booth, so I'll definitely continue making these and plan to add some to my etsy shop soon.

Friday, March 23, 2012

Lots of Sewing and The Craft House

I've actually been doing quite a lot of sewing lately, just not very much blogging (or picture taking). I need to work on making blogging more of a balance within the crafting parts of my life.

The biggest news is that I've rented a booth at The Craft House, a shop specializing in handcrafted items. If you are in the Lafayette, Indiana area, I do hope that you will come visit the shop, which is located at 846 Main Street in downtown Lafayette (open hours are Tues-Thurs from 10am-5pm and Fri-Sat from 10am-6pm). So that means there are two downtown locations where you can find my items (the other is NPEN, which I posted about previously).

I have been spending a lot of time lately building up inventory for those locations and not as much time sewing on projects for myself. So that means that the quilt that I am making for Luke has been put aside for a little while. But I did finish piecing together the front, so I'm really happy about that and how it looks. I've been reading up on blog posts and tutorials about putting a quilt together and I think I have it figured out, at least in theory. So I do plan to actually put that theory into practice soon. I am looking forward to seeing how it turns out!

 
Mostly I've been sewing rice therapy bags and boo boo bags. Basically, the idea is that you can either heat it in the microwave for heat therapy or put it in the freezer for cold therapy. I add a little bit of lavender both for the pleasant and relaxing scent as well as to make it not smell quite as much like rice. (I've mentioned these bags a couple of times in previous blog posts.) I feel like I've really gotten the process of making these down and I'm quite happy with the outcome. Along with the larger bags, I've been making mini bags (these are the boo boo bags) in fun kid-friendly fabric so that parents can use them to help kids with any ouchies they might experience. The boo boo bags are also a good size for breastfeeding women who have a clogged duct or mastitis because it can be heated or cooled and placed in the bra.

It seems like these are a good idea because I've had them in the shop for just a week now and I've already sold several, so I'm really happy about that (and thank you to those who have bought them!). I've been working on creating more so that I can restock them as they sell. So I have a bunch of bags in varying stages of readiness. Some have been sewn and need to be turned right side out. Some have been turned right side out (and for the bigger ones have had channels sewn) and need to be filled. Ah, filling these bags. There have been times when rice just goes everywhere! It's definitely a challenge to fill them, but I think I'm finally figuring out a good way of doing it that, while slow, doesn't end up with rice all over the couch and floor.

Ready to be turned right side out

Ready to be filled with rice and lavender


This is one of my favorite fabrics for these bags!


The picture here doesn't capture how lovely this purple fabric truly is.

 I've been trying to decide what else to work on for the booth (as well as the Etsy shop) and I've decided that I really enjoyed making the mug rugs, so I want to do more of those. And so I've gotten several charm packs and packages of binding and I'm having a good time putting the fabric together and making what are essentially mini quilts. I've already finished two more, which I'll be taking to The Craft House soon.

Front sides

Back sides
So although I may not have been doing a lot of blogging lately, my sewing machine has been busy!

Monday, March 5, 2012

Baby Quilt Update - Four Rows Joined

I finished sewing the strips for the rows together this morning (had just one left) and started on putting the rows together. I got four rows joined and have five left to go. What I'm finding most challenging is making sure that the corners line up. And although I'm trying really hard to focus on that, there are a few that are out of line. But I don't think any are too horrible so I'm going to leave them as is. If I get something too far off on any of the remaining rows, then I'll rip out that seam, but so far it is going okay as long as I keep things slow. Here's a picture of the joined rows so far:


Friday, March 2, 2012

Items for Sale at NPEN and Start of Baby Quilt

Yesterday afternoon, I took a load of items, both knitted and sewn, to a local organization -- Natural Parenting Education Network -- to make them available for sale in NPEN's boutique (while I was there I bought the cutest sewn bib from Amanda of This and That Boutique). This organization is fairly new and has been offering some wonderful outreach programs and events for the community. A portion of each purchase there goes to NPEN, so I hope that some of my items sell so that the sales can help out this awesome organization. If you are nearby, then I hope you will visit (check website for location and hours).

The knitted items: a wash cloth, two pairs of adult socks and two pairs of adult slipper socks, two baby hats, and two pairs of baby socks.
These are the rice bags, filled with a little lavender in addition to the rice.
These are burp cloths (cotton on the front and terrycloth on the back)
Sets of 2 pacifier clips with matching carrying bag.
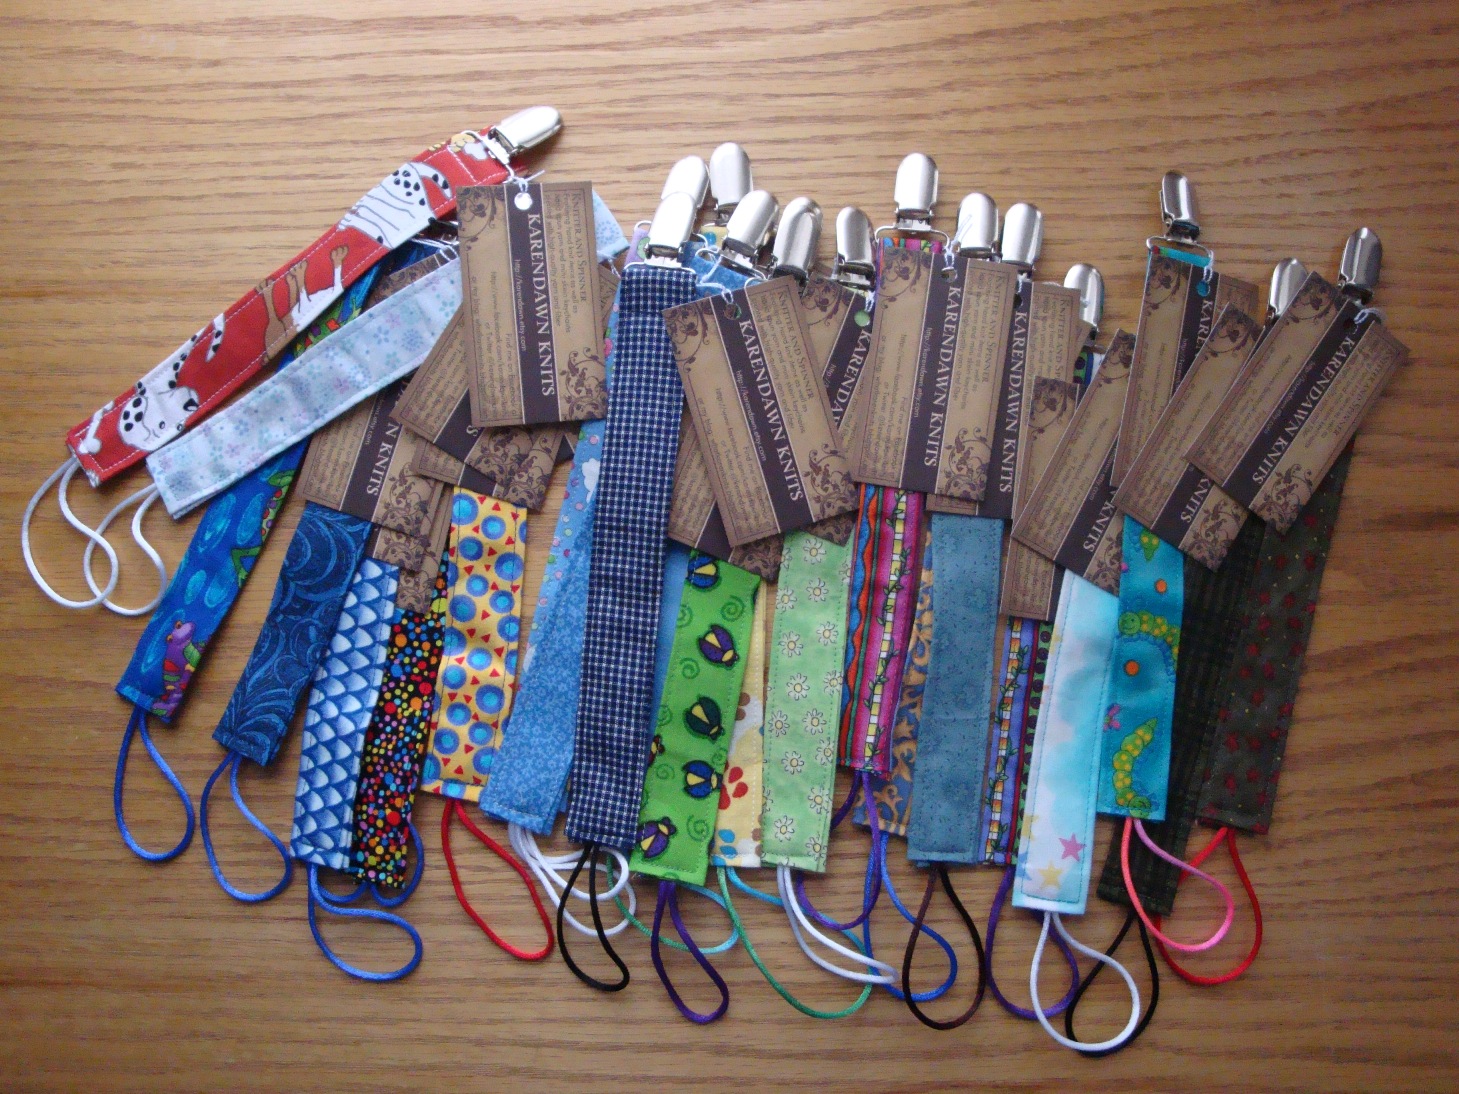
22 Pacifier Clips; I had so much fun playing with all of these fabric choices.
In other sewing news, I got started on the baby quilt for my son (which will be my first quilt). First, I opened up the three charm packs and set out the squares so I could see what was available. I'm glad that I got three packs because some of the patterns (such as the owls) were very limited in number, so having three packs to choose from helped me to keep the variety rather than getting stuck with some of the same squares over and over. (I think I'll make some boo boo bags -- mini rice bags -- with the leftover squares.)

It took a while to get the squares in an order that I was happy with. Actually, the initial setup wasn't too difficult. But at the end, I found one hole where I couldn't figure out which square to put in. Finally I had to start rearranging some of the other squares before I could actually fill that hole (making sure that the same color or pattern was not side by side). I completely forgot to take a picture while I had the squares laid out. I thought about it when I had almost finished picking up the squares.

Over the past three days I've sewn one strip of seven squares per day. I'm going really slowly with these to make sure my seam is completely straight. I want this quilt to be the best that I can do for my first time and I know that rushing through it will leave wonky seams and an unsatisfying project. So here are the three rows that I've finished so far.


I went to Joann's the other day and found some fabric for the border. It's a stripe pattern with browns and blues that I think will look nice. I'm not sure yet what I'll use for the backing. I think I'll wait until I have the front pieced together and then I'll go browse when I have a good idea of what it all will look like.

Tuesday, February 28, 2012

Pacifier Clips Galore and More

I'm going to be selling some of my items (both sewn and knit) in a shop downtown--a really neat place called the Natural Parenting Education Network--so I've been working on creating more inventory. So one thing I've been doing is making a whole bunch of pacifier clips. I've been trying to get a variety of fabric so that there are a lot to choose from. I also made a few sets of the clips with a matching carrying bag. I have the rice bags and plan to make a few more (the lavender, by the way, makes it smell so wonderful!) as well as some small "boo boo sacks" for kids. And I've been knitting baby hats and have some other knitted items to take there. I'm excited to be part of the boutique and to also help out NPEN so it can continue to offer the wonderful programming and events it has been doing.

But I have to admit that I'm a little burned out on making pacifier clips! I have six more all ready to go but for the sewing up, so I think I'll finish those and then take a break from making them for a little while. After doing the extra rice bags and boo boo sacks, I'm going to work on another project--for me. Or rather, for my son.

I'm going to try my hand at making a quilt. I have no idea how successful I'll be, but I'm going to try. It's going to be simple. I bought some charm packs, so I'll just be sewing the squares together and then for the quilting I'll do simple diagonal lines. But I picked some fabric that I'm really excited about and I'm sure that I'll learn a lot from this simple (although for me perhaps not so simple since it will be my first time) project.

I looked through the various charm packs available at Fat Quarter Shop and really liked Ten Little Things, so that is the one I decided to go with (and I will definitely order from FQS again as it was shipped promptly and was easy to order). I bought three packs so that I would have plenty of each square to choose from. And any leftovers will be used to do some applique on onesies and bibs. I need to figure out how big I want to make it so that I'll know how many squares to sew for each row and then how many rows to make. But first I need to do some reading up on how to do something like this. I think the biggest question I have right now is about which way to press the seams, so that's what I'm going to focus on right now. Then I'm just going to dive right in.

I don't yet have the fabric for the back or border. I want to get the top pieced first and then make a decision for what I want to do for that.


I had to come back and edit this post after what I saw on Geek Crafts today: A Call to Arms


Saturday, February 18, 2012

Labels and Rice Bags

Two small projects (one super small) have been all I've had time for lately. First, I made some sew-on labels by using transfer paper and ribbon. I'm rather pleased with how they turned out.

Second, I made up a couple more rice bags (and plan to make more). This time I added in some lavender to the rice to help make it smell better. And I also added in a label to each bag. I really like how it looks with the label.


I also worked on getting some packaging ideas together. The one that is pretty much finished is the packaging for the pacifier clips. Here's what I have. Very simple, but I like it.

I hope to make more rice bags, some burp cloths, some more pacifier clips and matching bags this week. We'll see how much I actually have time to do!

Saturday, February 11, 2012

Charger Cords Holder

My husband and I have quite a few electronic devices and organizing and keeping track of the various charging cords has been a hassle. So I wanted to have some type of wall hanging with pockets that would help to keep all of the cords. On one of my favorite sewing blogs, Sew4Home, I found a tutorial for a 9-Pocket Door Caddy. Perfect!

It took me about a week to finish this project. Last weekend, I went to Joann's to look for fabric. I had learned from the previous project not to get something that matched too much. I wanted something brown because that's the color of the walls and some of the other decor in the room I plan to hang it. I found this lovely dark brown fabric with teal decorations on it. For the trim fabric, I was going to go with a completely different color, but after trying a few out, I found this fabric that was also brown and teal, but more of the teal and less brown. I debated for quite a while about it (although I knew that I needed to hurry home soon because my son would be hungry), but decided that although they were the same colors, the density of the colors were different in each fabric and the patterns were also different enough. Looking at the finished project, I think I did a much better job this time around with picking the fabric.

So I started by cutting out all my pieces and that's as far as I was able to get that day. I started with the pockets first (I had gotten the wrong interfacing so had to go back to get some more and so skipped over the first section until I could go get more). Just like the previous project, this one called for me to stitch the ditch. That was challenging last time, but this time the instructions were different. Instead of folding and pinning like the book said, the blog said to place the pin in the ditch itself. This made so much sense. By doing this, I could look at the back side and actually see whether or not I had caught the fabric on the back side in my stitch. This was so much easier than doing it the previous way and so this is how I will remember to stitch the ditch in the future.

Placing the binding was the easy part of the pockets. The next step was to do two pleats for each pocket panel. It was my first time to do a pleat, but Sew4Home had excellent instructions so I feel that I handled it okay. But doing the first pocket panel took quite a while so that was all I got done that day. The next day I was able to complete the two remaining pocket panels. It got a lot easier to do since I had already gone through the steps once before.

On Tuesday, I was able to get back to Joann's to get the correct interfacing. On this day I was able to sew the main body pieces together (the first section of the tutorial). I tackled the binding for the body the next day. For doing the corners of the binding, I actually preferred the method used in the Stitch by Stitch book, so I used that instead of the one on the tutorial, although they were very similar.

Then I came to the spot where I felt the tutorial was confusing and I got lost. Joining the two ends (start and finish) of the binding together (steps 10-15 of this section). I read the instructions several times and twisted and turned my two ends of binding, finally deciding which was to sew them. But when I cut down the ends, I realized that I had sewed them more as a mobius strip instead of flat. I went back to the instructions and just couldn't get it. So I just ripped it out and tucked the ends under. I think that had I been able to follow the tutorial, it would have made a very nice join, but it turned out okay. Perhaps I'll try this section of the tutorial again in the future (or maybe see if there is a video or another set of instructions for this technique). Pictures would have been very helpful for this section and is my only criticism of this tutorial.

I didn't get a chance to sew on Thursday and I didn't think that I would on Friday, but after my son went to bed, my husband wanted to play a computer game so I found myself with a little time on my hands. I decided to sew on the pocket panels. The most difficult part of this process was placing the panels. The instructions are very clear, but I was having problems seeing my chalk lines (since it was evening, the light in the room wasn't as bright so I was having a hard time seeing period), so I just eyeballed some of it. Then I sewed the pocket panels on and it was almost complete. I just had the grommets to add at the top. That turned out to be pretty simple (once I figured out which two pieces of the grommet to use--at first I had two of the same pieces instead of two different ones and couldn't figure out how they were supposed to snap together).

I'm so happy with how this project turned out and I can't wait to have all the charging cords organized for once!